
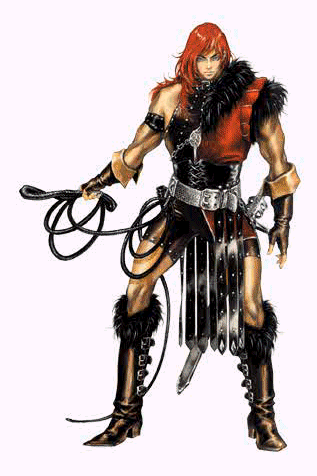
Kireme
Inspiration for Kireme:
Mifune from Soul eater, this character is huge inspiritoon for Kireme.
Basically I want this anime character in a 2d game. He uses 20 + sword which he throws onto the ground and then picks up and fight with them.
- I was like ooooo cooool- slightly reminds me of Guts(Berserk) battle at the graveyard hmm.
In all seriousness. It really gave me some ideas to tinker around with. However, as Mifune fights in a 3d world I had to really think to make it viable and feel similar in a 2d game. And by that I mean similar to how I imagine it would be watching the anime...
Anyway it turned to become something that involves the user placing swords at the wall of the game(the wall into the screen (z value)).
But I wanted the swords to be more interactive so I designed for them to be singed in between like
Simon Belmont

And indirectly Harrison Ford.
The game mechanic of the whip. Is the core fundamental of Simon. And he can use it the games to swing himself from different platforms and in newer castlevania games where the player plays another Belmont, so more precise would be to say that the swing fundamental comes from the Belmont family.
In the games the main character can swing between points in using several swing to being able to jump over holes or to climb upwards in the game.
The basic idea is that Kireme will be moving around as a Belmont.
But how to come to this?
He will be able to place the swords similar to
Bang Shishigami.
Bang can place up to four spikes in the air which he can jump on. Kireme will instead be able to swing to them. Bang also have a limitation of 12 per match. This is a good way to limit and control a characters power.
Kireme has the limit of 5. But Kireme will have an energy resource ability which will give him 5 more swords to place in the air. This to balance him and most important create a strategy element of how worth it is to place more swords.
So this character fight like this. Places sword like bang. And then swing between them to deal damage or to avoid being hit be enemy.
He will also be able to teleport to a given sword. So its very important for the player to remember where the sword is placed.
He is a control character in a way but is played as a fast character.
Stats:Average character:
Health pool:The basic value is 100: Kireme will have 85: Hes slight geared to speed so he will have less life, and his general theme of flying around with this rift trail will make him be hard to hit.
Agility/Mobility: Basic value 10: Kireme will have 5 and 10 in the air: Kireme is centered around using his rift trail to jump between his swords, by this he will be very fast in the air. Hes attack shouldn't be so fast as his whole body is a damage zone when he is connected to a sword and using his swing ability,
Strength: Basic value 10: Kireme will have 10: As Kireme’s attacks are pretty slow he need some damage but mostly he will have an unique attack with the swing combos. So his strength stat wont be that important for him except for normal attacks. Which I don't think he will use that often.
Recovery: Basic value 10. Kireme will have 14: This is because he need to set his sword out and with high recovery he can block easier. As he is forced to use his sword he cannot have to low recovery as then the enemy could to easily punish him.
Weight: Basic value 50: Kireme will have 50:
Prime core gameplay:
The play style with Kireme is to place out his 5 swords in the air. After this he can swing to them like Simon Belmont (or other Castlevania heroes). He can also teleport to them. And draw them back to him with is Rift whip. By this the placing of the sword is very crucial for victory. Kireme being a Speed Control character this is the basic idea. The user need to remember where he/she placed the swords and plan ahead how to use them correctly. She/he will also have an Energy ability which will increase his sword count from 5 to 10.
Kireme moves slowly on the ground but in the air he has increased mobility plus after having connected to a rift spot(sword) he will have even further increased speed. Essentially Kireme is kinda weak at the start of the game, he grows stronger with good placement of swords and if the user save the energy, she/he can further have more swords, meaning even stronger late game.
This is good as it suits the control gameplay but as its based around speed its becomes speed control.
The swords can be used in many different ways, for example they can then be spread around the swords at a close center to, give opportunity for massive combos or to distribute the swords even, in the Fight world to be equally strong everywhere.
Kireme can redraw a sword to create unblockable combos. He can also use his escape mechanic(rift Walk) to flee or to attack as its an teleport to desired sword. This also means that the opponent user, have to remember where the swords are placed. not only to avoid the obvious combo positioning but also to avoid both unblockable situations or to back into a sword and getting teleport attack.
Kireme’s normal throws have special effect. Two of them(one in air and one ground) uses Stun game mechanic to enable combos.
Kireme is one of the harder character to play with. He both requires good planning and his combos are long.
The Kireme play style will be to move around and avoid opponents attack with Rift Path. Kireme is fairly slow with normal movement but in air he is faster and using Rift Path, he can create unique movement paths no other character have. Used correctly Kireme should be really good at getting close or avoiding his opponent.
Ui: Kireme has a sword count up in the right corner below his Health bar.
Game resource:
Kireme have two individual game resource a stack of 5 swords(which cane be increased) he can uses them as projectile. And by doing that he gain a new game resource. “Rift Holes” which he can use different abilities with.
Unique game mechanics:
Throw:
Throws stuns them at place. Both in air and on ground
Ground front throw throws them down.
Ground back throw stuns them(combo enable)
Air front throws Stuns them
Air back throw press them down
Throws.
Front throw: L+M
Priority: 3
Strength always does 10 damage
Recovery/ 6
Mobility: 4
Effect: Always does 10 damage(regardless of character) Can be canceled by the opponent by pressing the opposite throw(H+HV) then nothing happens(throw escape).
Front throw in air: L+M
Priority: 3
Strength always does 3 damage
Recovery/ 0.1
Mobility: 5
Effect: Stun effect: Switches side, Kireme appears behind the opponent when the throw is over.
Always does 3 damage(regardless of character) Can be canceled by the opponent by pressing the opposite throw(H+HV) then nothing happens(throw escape).
Back throw: H+HV
Priority: 3
Strength always does 3 damage
Recovery/ 0.01
Mobility: 4
Effect: Stun effect: Switches side, Kireme appears behind the opponent when the throw is over.
Always does 3 damage(regardless of character) Can be canceled by the opponent by pressing the opposite throw(L+M) then nothing happens(throw escape).
Back throw in air: H+HV
Priority: 3
Strength always does 7 damage
Recovery/ 5
Mobility: 5
Effect: Press the opponent straight down. Always does 7 damage(regardless of character) Can be canceled by the opponent by pressing the opposite throw(H+HV) then nothing happens(throw escape).
Unique movements.
Double dash. Kireme can do two air dashes.
Rift Path(Read below for inputs, mechanics etc):
Kireme can travel by connecting his body to sword in the air. This will increase his movement speed. He controls it by.
Left to move clock wise.
Right to move anti clock wise.
Up to move in to the sword.
Down to move away from the sword.
Unique attacks(input attacks)
CrVH, makes the enemy fall down(knock down effect)
Crescent Cut Ground. VH3. Diagonal forward down.
Priority: 3
Strength X 0.3
Recovery/ 0.5
Mobility: 6
Effect: Launcher game mechanic: Small knock up attack, lifts the enemy into the air. Good ground finisher in combos.
Crescent Cut Air. VH3. Diagonal forward down.
Priority: 3
Strength X 0.3
Recovery/ 0.5
Mobility: 6
Effect: Launcher game mechanic: Small knock down attack, press the enemy downwards in the air.
This might sound pointless. But it could be that a sword is lower then the current position of the opponent. Then Kireme can hit them with Crescent Cut and make them fly to the sword before they can move again he can use Rift Walk and hit them, continuing the combo.
Wakizashi Stab. 4L : Back light.
Priority: 1
Strength X 0.1
Recovery/ 0.1
Mobility: 6
Effect: Will not add to diminishing.(its not counted as damage reducer)
Can only be used once per, set of combo space. once on ground once per jump/dash or once per rift whip travel.
A very fast attack with almost no recovery to be used to make combos longer.
Basically this attack is meant to be inputted in every combo part. To make it harder to play Kireme.
Sky Stab.VH9 Diagonal forward up.
Priority: 1
Strength X 0.3
Recovery/ 0.5
Mobility: 6
Effect: Will hit the opponent and press them slightly upwards, used to extend combos.
Earth Divider: Cr.H Hold down H.
Priority: 3
Strength X 0.3 + Distance traveled in Air.
Recovery/ 5
Mobility: 15
Effect: Can only hurt opponent on ground, or straight below Kireme. Increases his travel speed, good engage attack from the air.
Distance is equal to screen space. 1% travel on screen space increase the damage by 0.25%.
From at the height of 2 screen heights. This would be a damage of increase of 50%.
Total damage would be 0.5 + 0.2.5 x 10 = 7.5
Special abilities:
Projectile attacks(all projectile attacks can be used in the air):
Where the sword stops will create a rift to another dimension. Kireme can travel to different rift holes with is Rift Walk. And he can use his Rift whip to connect his body with the sword.
Limit of 5 throws. Will gain 5 more by using Magic satchel.
Cutting Edge: Quarter forward L. Press L again to stop the sword.
Priority: 4
Strength X 0.5
Recovery/ 3
Mobility: 7
Cost: 1 sword
Effect: Throws a sword. Flies in a straight line. The user can press L again to stop the sword from traveling. The sword stops from being intercepted by another projectile. Or by hitting the opponent.
Piercing Edge: Dragon input.(623) M. Press M again to stop the sword.
Priority: 4
Strength X 0.5
Recovery/ 3
Mobility: 7
Cost: 1 sword
Effect: Throws a sword. Flies in a straight line diagonal upwards. The user can press M again to stop the sword from traveling. The sword stops from being intercepted by another projectile. Or by hitting the opponent.
Rip Edge: Reverse Dragon input(421) H. Press H again to stop the sword.
Priority: 4
Strength X 0.5
Recovery/ 3
Mobility: 7
Cost: 1 sword
Effect: Throws a sword. Flies in a straight line diagonal downwards. The user can press H again to stop the sword from traveling. The sword stops from being intercepted by another projectile. Or by hitting the opponent.
Double Edge: Quarter forward VH. Press L to stop the low going sword, press M to stop the high going sword.
Priority: 4
Strength X 0.5(damage can be double if both sword hits)
Recovery/ 3
Mobility: 7
Cost: 2 swords
Effect: Throws 2 a swords. Its a combination of Cutting Edge and Piercing Edge.
The sword stops from being intercepted by another projectile. Or by hitting the opponent.
Both sword can hit, the user can stop the sword individually by use of different inputs.
Triple Edge:Quarter Backward VH. Press L to stop the mid air going sword, press M to stop the high going sword, press H to stop the low going sword.(only usable in air)
Priority: 4
Strength X 0.5(damage can be tripled if both sword hits)
Recovery/ 3
Mobility: 7
Cost: 3 swords
Effect: Throws 3 a swords. Its a combination of Cutting Edge, piercing Edge and Rip Edge.
The sword stops from being intercepted by another projectile. Or by hitting the opponent.
All 3 swords can hit, the user can stop the sword individually by use of different inputs.
-This attack might seem to strong but it cost 3 swords, making it very non worth using to deal 15 damage with. It’s an option the user have late game or to get 3 swords out quickly late game.
Generally its a fast way to spread out 3 swords but very hard to control.
Rift Whip. S Any 8 direction for attack.
Priority: 3
Strength X 0.1
Recovery/ 2 (user cant attack right away afterwards but they can still move)
Mobility: 7
Effect: Connects Kireme with a sword.
He can now use Rift path. And Drawback.
Rift Path: S to release the whip
Priority: 3
Strength X 0
Recovery/ 0.001
Mobility: 15
Effect: Connected with another dimension gives Kireme free movement in the air.
Left to move clock wise.
Right to move anti clock wise.
Up to move in to the sword.
Down to move away from the sword.
By being connected the user can move around much faster. 15 movement instead of 10 in air (5 at ground). This move can be used on ground by connection to a sword while standing and then going into a sword. For example after the user uses Cutting Edge they can use Rift whip to hit the sword and then press upwards, using Rift Path to go in very fast towards the opponent.
This movement game mechanic can also be used in several different ways for air combos.
The most prominent is to hit the opponent with Rift whip and on the same time hit a sword by that Kireme can travel in close while the opponent still cant block and start of a combo.
He can also jumps between swords with this(like in Castlevania). This can be used to further make very long combos. It can also be used to avoid opponent attacks. Or to move fast close to an opponent.
Drawback. Quarter Back S.
Priority: 3
Strength X 0.3
Recovery/ 2
Mobility: 5
Cost:Removes the sword(takes away the Rift Hole) Has to be connected with a Sword.
Effect: Reclaim one sword. Increasing Kiremes sword count by one.
The user can combine this attack with an front assault to set a unblockable combo.
By Using drawback from behind the opponent. Or by moving over/under them with very fast movement while the sword is traveling to Kireme.
Energy abilities:
Rift Walk: S for closest Sword. S+L for next closest, S+M for next, S+H,S+VH, S+L+M , S+L+H etc. All combination of buttons.
Priority: 99
Strength X 0.8
Recovery/ 0.01
Mobility: Instantly
Cost:1 Energy
Effect:
This is Kiremes escapes mechanic. Its a blink strike game mechanic. He appears to the users desired sword(location) and do an attack.
To control the user have to Combine the S button with different buttons. S to get to the closest sword and then S+L if there is 2 sword on the screen. This means that if there is 3 swords on the screen its not S+L+M+V+VH to reach the furthest away but S+M. This because S+H its an easy input, although this might look like it will always be to much sword a normal game Kireme is calculated to have 10 swords at total and around 3-5 at the screen. Meaning in an actual game the user rarely will use more then S+VH. And even if the user had more Swords, the ordinary use will be to get to the closest or next closest for combos.
Magic satchel. S Full circle.
Priority: 101
Strength X 0
Recovery/ 0.001
Mobility: Instantly
Cost:5 Energy
Effect: Increases Kiremes sword count with 5 more swords.
Can be used to cancel the user’s own combos. It can be used to extend a combo.
The use of that could be that in the air use Magic satchel and then for example use Triple Edge.
Explanation Image Kireme:
The different movement abilities Kireme have. How the projectile attacks can be used to put rift points.

Combo List:
Simple normal attacks
Back throw can be used before any of this ground combos as it creates a stun effect
L.L
L.L.L
L.L.M
L.CrL.CrL.
CrL.L
CrL.CrM
M.L
M.M
M.V
M.CrL
M.CrM
H.VH
H.CrL
H.CrM
CrH.L
CrH.M
CrL.CrVH - makes opponent fall down.
Wakizashi Stab(back light)
Wakizashi Stab.L
Wakizashi Stab.L.L
Wakizashi Stab.L.L.L
Wakizashi Stab.L.L.M
Wakizashi Stab.L.CrL.CrL.
Wakizashi Stab.M.L
Wakizashi Stab.M.M
Wakizashi Stab.M.V
Wakizashi Stab.M.CrL
Wakizashi Stab.M.CrM
Wakizashi Stab.H.VH
Wakizashi Stab.H.CrL
Wakizashi Stab.H.CrM
Crescent Cut((Ground). (Diagonal forward down VH) simple combos
(Wakizashi Stab can be added in this to of course)
(Wakizashi Stab).L.Crescent Cut
(Wakizashi Stab).L.L.Crescent Cut
CrL.L.Crescent Cut
CrL.CrM.Crescent Cut
(Wakizashi Stab).M.L.Crescent Cut
(Wakizashi Stab).M.M.Crescent Cut
(Wakizashi Stab).M.V.Crescent Cut
(Wakizashi Stab).M.CrL.Crescent Cut
(Wakizashi Stab).M.CrM.Crescent Cut
(Wakizashi Stab).H.CrL.Crescent Cut
(Wakizashi Stab).H.CrM.Crescent Cut
CrH.L.Crescent Cut
CrH.M.Crescent Cut
Strongest normal attack ground combo.
Back Throw.Wakizashi Stab.M.V.Crescent Cut
Crescent Cut used to bring opponent in the air.
(each of the combos ending with, the list follows the strongest combo)
(Still just normal attacks, Rift combos later because they will get much more complicated)
This combo is extend able with Dash. The strongest version is to use
Sky Stab(Diagonal forward up VH). To gain more height. And then use Dash diagonal upwards to get close again. Sky Stab can be followed by
Crescent Cut Air. (Diagonal forward down VH) . But this will put the opponent downwards and will end the combo(at this height).
Back Throw.Wakizashi Stab.M.V.Crescent Cut.Jump.
Back Throw.Wakizashi Stab.M.V.Crescent Cut.Jump.L
Back Throw.Wakizashi Stab.M.V.Crescent Cut.Jump.L.Sky Stab
Back Throw.Wakizashi Stab.M.V.Crescent Cut.Jump.L.Sky Stab.Crescent Cut
Back Throw.Wakizashi Stab.M.V.Crescent Cut.Jump.L.Front Throw
Back Throw.Wakizashi Stab.M.V.Crescent Cut.Jump.L.Front Throw.L.
Back Throw.Wakizashi Stab.M.V.Crescent Cut.Jump.L.Front Throw.L.L
Back Throw.Wakizashi Stab.M.V.Crescent Cut.Jump.L.Front Throw.L.L.L
Back Throw.Wakizashi Stab.M.V.Crescent Cut.Jump.L.Front Throw.L.M
Back Throw.Wakizashi Stab.M.V.Crescent Cut.Jump.L.Front Throw.M.V
Back Throw.Wakizashi Stab.M.V.Crescent Cut.Jump.L.Front Throw.M.V.Sky Stab
Back Throw.Wakizashi Stab.M.V.Crescent Cut.Jump.L.Front Throw.M.V.Sky Stab.Crescent Cut
Back Throw.Wakizashi Stab.M.V.Crescent Cut.Jump.L.Back Throw
Back Throw.Wakizashi Stab.M.V.Crescent Cut.Jump.L.L
Back Throw.Wakizashi Stab.M.V.Crescent Cut.Jump.L.L.Sky Stab
Back Throw.Wakizashi Stab.M.V.Crescent Cut.Jump.L.L.Sky Stab.Crescent Cut
Back Throw.Wakizashi Stab.M.V.Crescent Cut.Jump.L.L.Dash.Front Throw
Back Throw.Wakizashi Stab.M.V.Crescent Cut.Jump.L.L.Dash.Back Throw
Back Throw.Wakizashi Stab.M.V.Crescent Cut.Jump.L.L.L
Back Throw.Wakizashi Stab.M.V.Crescent Cut.Jump.L.L.M
Back Throw.Wakizashi Stab.M.V.Crescent Cut.Jump.L.L.V
Back Throw.Wakizashi Stab.M.V.Crescent Cut.Jump.M.L
Back Throw.Wakizashi Stab.M.V.Crescent Cut.Jump.M.L.Sky Stab
Back Throw.Wakizashi Stab.M.V.Crescent Cut.Jump.M.L.Sky Stab.Crescent Cut
Back Throw.Wakizashi Stab.M.V.Crescent Cut.Jump.M.M
Back Throw.Wakizashi Stab.M.V.Crescent Cut.Jump.M.M.Sky Stab
Back Throw.Wakizashi Stab.M.V.Crescent Cut.Jump.M.M.Sky Stab.Crescent Cut
Back Throw.Wakizashi Stab.M.V.Crescent Cut.Jump.M.V
Back Throw.Wakizashi Stab.M.V.Crescent Cut.Jump.L.M.V
Back Throw.Wakizashi Stab.M.V.Crescent Cut.Jump.L.M.V.Sky Stab
Back Throw.Wakizashi Stab.M.V.Crescent Cut.Jump.L.M.V.Sky Stab.Crescent Cut
Back Throw.Wakizashi Stab.M.V.Crescent Cut.Jump.H.VH
Wakizashi Stab can be use to make a combo phase stronger.
Strongest combo with usage of two Crescent Cut.
At this height Earth Divider: Cr.H Hold down H. Can be added(as a finisher).
Back Throw.Wakizashi Stab.M.V.Crescent Cut.Jump.Wakizashi Stab.L.Front Throw.M.V.Sky Stab.Dash
Back Throw.Wakizashi Stab.M.V.Crescent Cut.Jump.Wakizashi Stab.L.Front Throw.M.V.Sky Stab.Dash.L
Back Throw.Wakizashi Stab.M.V.Crescent Cut.Jump.Wakizashi Stab.L.Front Throw.M.V.Sky Stab.Dash.L.Sky Stab
Back Throw.Wakizashi Stab.M.V.Crescent Cut.Jump.Wakizashi Stab.L.Front Throw.M.V.Sky Stab.Dash.L.Sky Stab.Crescent Cut
Back Throw.Wakizashi Stab.M.V.Crescent Cut.Jump.Wakizashi Stab.L.Front Throw.M.V.Sky Stab.Dash.L.Sky Stab.Crescent Cut.Dash.
Back Throw.Wakizashi Stab.M.V.Crescent Cut.Jump.Wakizashi Stab.L.Front Throw.M.V.Sky Stab.Dash.L.Sky Stab.Crescent Cut.Dash.Earth Divider
Back Throw.Wakizashi Stab.M.V.Crescent Cut.Jump.Wakizashi Stab.L.Front Throw.M.V.Sky Stab.Dash.L.Dash.Back Throw
Back Throw.Wakizashi Stab.M.V.Crescent Cut.Jump.Wakizashi Stab.L.Front Throw.M.V.Sky Stab.Dash.L.Dash.Front Throw.
Back Throw.Wakizashi Stab.M.V.Crescent Cut.Jump.Wakizashi Stab.L.Front Throw.M.V.Sky Stab.Dash.L.Dash.Front Throw.L.
Back Throw.Wakizashi Stab.M.V.Crescent Cut.Jump.Wakizashi Stab.L.Front Throw.M.V.Sky Stab.Dash.L.Dash.Front Throw.L.L
Back Throw.Wakizashi Stab.M.V.Crescent Cut.Jump.Wakizashi Stab.L.Front Throw.M.V.Sky Stab.Dash.L.Dash.Front Throw.L.L.L
Back Throw.Wakizashi Stab.M.V.Crescent Cut.Jump.Wakizashi Stab.L.Front Throw.M.V.Sky Stab.Dash.L.Dash.Front Throw.L.M
Back Throw.Wakizashi Stab.M.V.Crescent Cut.Jump.Wakizashi Stab.L.Front Throw.M.V.Sky Stab.Dash.L.Dash.Front Throw.M.V
Back Throw.Wakizashi Stab.M.V.Crescent Cut.Jump.Wakizashi Stab.L.Front Throw.M.V.Sky Stab.Dash.L.Dash.Front Throw.M.V.Sky Stab
Back Throw.Wakizashi Stab.M.V.Crescent Cut.Jump.Wakizashi Stab.L.Front Throw.M.V.Sky Stab.Dash.L.Dash.Front Throw.M.V.Sky Stab.Crescent Cut
Back Throw.Wakizashi Stab.M.V.Crescent Cut.Jump.Wakizashi Stab.L.Front Throw.M.V.Sky Stab.Dash.L.Dash.Front Throw.M.V.Sky Stab.Crescent Cut.Dash.Earth Divider
Back Throw.Wakizashi Stab.M.V.Crescent Cut.Jump.Wakizashi Stab.L.Front Throw.M.V.Sky Stab.Dash.L.L
Back Throw.Wakizashi Stab.M.V.Crescent Cut.Jump.Wakizashi Stab.L.Front Throw.M.V.Sky Stab.Dash.L.L.Sky Stab
Back Throw.Wakizashi Stab.M.V.Crescent Cut.Jump.Wakizashi Stab.L.Front Throw.M.V.Sky Stab.Dash.L.L.Sky Stab.Crescent Cut
Back Throw.Wakizashi Stab.M.V.Crescent Cut.Jump.Wakizashi Stab.L.Front Throw.M.V.Sky Stab.Dash.L.L.L
Back Throw.Wakizashi Stab.M.V.Crescent Cut.Jump.Wakizashi Stab.L.Front Throw.M.V.Sky Stab.Dash.L.L.M
Back Throw.Wakizashi Stab.M.V.Crescent Cut.Jump.Wakizashi Stab.L.Front Throw.M.V.Sky Stab.Dash.L.L.V
Back Throw.Wakizashi Stab.M.V.Crescent Cut.Jump.Wakizashi Stab.L.Front Throw.M.V.Sky Stab.Dash.M.L
Back Throw.Wakizashi Stab.M.V.Crescent Cut.Jump.Wakizashi Stab.L.Front Throw.M.V.Sky Stab.Dash.M.L.Sky Stab
Back Throw.Wakizashi Stab.M.V.Crescent Cut.Jump.Wakizashi Stab.L.Front Throw.M.V.Sky Stab.Dash.M.L.Sky Stab.Crescent Cut
Back Throw.Wakizashi Stab.M.V.Crescent Cut.Jump.Wakizashi Stab.L.Front Throw.M.V.Sky Stab.Dash.M.M
Back Throw.Wakizashi Stab.M.V.Crescent Cut.Jump.Wakizashi Stab.L.Front Throw.M.V.Sky Stab.Dash.M.M.Sky Stab
Back Throw.Wakizashi Stab.M.V.Crescent Cut.Jump.Wakizashi Stab.L.Front Throw.M.V.Sky Stab.Dash.M.M.Sky Stab.Crescent Cut
Back Throw.Wakizashi Stab.M.V.Crescent Cut.Jump.Wakizashi Stab.L.Front Throw.M.V.Sky Stab.Dash.Jump.M.V
Back Throw.Wakizashi Stab.M.V.Crescent Cut.Jump.Wakizashi Stab.L.Front Throw.M.V.Sky Stab.Dash.L.M.V
Back Throw.Wakizashi Stab.M.V.Crescent Cut.Jump.Wakizashi Stab.L.Front Throw.M.V.Sky Stab.Dash.L.M.V.Sky Stab
Back Throw.Wakizashi Stab.M.V.Crescent Cut.Jump.Wakizashi Stab.L.Front Throw.M.V.Sky Stab.Dash.L.M.V.Sky Stab.Crescent Cut
Back Throw.Wakizashi Stab.M.V.Crescent Cut.Jump.Wakizashi Stab.L.Front Throw.M.V.Sky Stab.Dash.H
This can be followed by another Dash as Kireme can do two Dash in the air.
Strongest Combo.
Back Throw.Wakizashi Stab.M.V.Crescent Cut.Jump.Wakizashi Stab.L.Front Throw.M.V.Sky Stab.Dash.L.M.V.Sky Stab.Dash
This combo can be exactly repeated like the former one.
For example
Back Throw.Wakizashi Stab.M.V.Crescent Cut.Jump.Wakizashi Stab.L.Front Throw.M.V.Sky Stab.Dash.L.M.V.Sky Stab.Dash.L.L.L
or
Back Throw.Wakizashi Stab.M.V.Crescent Cut.Jump.Wakizashi Stab.L.Front Throw.M.V.Sky Stab.Dash.L.M.V.Sky Stab.Dash.L.M.V
So its just the exact same list again but the Dash.Throw combos cant be done.
For example this cant be done more with.
“Back Throw.Wakizashi Stab.M.V.Crescent Cut.Jump.Wakizashi Stab.L.Front Throw.M.V.Sky Stab.Dash.L.Dash.Front Throw.M.V.Sky Stab.Crescent Cut”
2 Dash used this combo cant be continued if the user don't use any special ability.
This is the strongest Normal combo Kireme has:
Back Throw.Wakizashi Stab.M.V.Crescent Cut.Jump.Wakizashi Stab.L.Front Throw.M.V.Sky Stab.Dash.Wakizashi Stab.L.M.V.Sky Stab.Dash.Wakizashi Stab.L.M.V.Sky Stab.Crescent Cut
(22 hits combo)
Special combos:(usage of Rift Whip, Rift Walk and projectiles)
The list can be longer, but that will be a little to much to read. So here the list will take in consideration that the user can do any of the normal combos used before and that the better combos where used(smaller combos could be extended with Rift Walk etc). This List will show how to extend the best normal combos.
By using:
Rift Walk (S for closest Sword. S+L for next closest) combos,
Rift Whip (S Any 8 direction for attack) combos and
Drawback (Quarter Back S) combos the user can extend the combos, very much.
Note that this biased on that the Swords are correctly placed, other wise this cant be done.
All Rift Whip combos are that Rift Whip hits a sword.
Rift Whip.Drawback.
Rift Whip.Drawback.L(unblockable combo)
If the user uses Rift Whip.Drawback. + attack this can open for an unblockable combo( the opponent needs to stand between Kireme and the sword). In this attack Rift Whip travels through the opponent to connect to the sword that is then right behind the opponent given no chance for the opponent to escape.
The former strongest normal attack could look like this instead
Rift Whip.Drawback.VH.Wakizashi Stab.M.V.Crescent Cut.Jump.Wakizashi Stab.L.Front Throw.M.V.Sky Stab.Dash.L.M.V.Sky Stab.Dash.L.M.V.Sky Stab.Crescent Cut
This would be slightly stronger and could be said also being a “normal combo” as it don't cost any energy.(But the sword and position most be very good).
Point is Back throw can be replaced by Rift Whip.Drawback.Attack
Rift Whip.Drawback.Dash.Dash.Dash.Attack
Using several Dash the user can make the sword travel after them and creating a unblockable combo positioning.
Rift Whip.Drawback.Dash(Air).Dash(Air).Dash..VH.Wakizashi Stab.M.V.Crescent Cut.Jump.Wakizashi Stab.L.Front Throw.M.V.Sky Stab.Dash.Wakizashi Stab.L.M.V.Sky Stab.Dash.Wakizashi Stab.L.M.V.Sky Stab.Crescent Cut
This combo is possible because the Dash count of 2 is refreshed being on the ground again.
-I think its better if I explain how Rift Walk and Rift Path can be used with examples.
First the use of Crescent Cut in Air exist mostly for the use of pushing the opponent in the placed swords at lower heights. For example if the user would use Cutting Edge at start a sword will be placed just above ground height.
For example this combo
Back Throw.Wakizashi Stab.M.V.Crescent Cut.Jump.L.Sky Stab.Crescent Cut
Which ends with a Crescent Cut can now be used to press the opponent to a sword.
This combo will basically move the opponent a bit backwards and keeping them slightly above ground.
Back Throw.Wakizashi Stab.M.V.Crescent Cut.Jump.L.Sky Stab.Crescent Cut.Rift Walk.
By doing this the user instead of using a Dash, spent 1 energy to Save that Dash. Adding some extra damage from the Rift Walk and still having 2 Dash.
So if this combo:
Back Throw.Wakizashi Stab.M.V.Crescent Cut.Jump.Wakizashi Stab.L.Front Throw.M.V.Sky Stab.Dash.Wakizashi Stab.L.M.V.Sky Stab.Dash.Wakizashi Stab.L.M.V.Sky Stab.Crescent Cut
(22 hits combo)
Looked like this instead.
Back Throw.Wakizashi Stab.M.V.Crescent Cut.Jump.Wakizashi Stab.L.Front Throw.M.V.Sky Stab. Add Crescent Cut here- .Crescent Cut. Then Rift Walk to move.
(could also be used with just Sky Stab to point the opponent upwards against a sword)
after this a “normal phase combo” could be added.
lets say the user did Wakizashi Stab.L.M.V.Sky Stab.
after this the user can go back to do the ordinary follow up on the normal combo.
-Dash.Wakizashi Stab.L.M.V.Sky Stab.Dash.Wakizashi Stab.L.M.V.Sky Stab.Crescent Cut
In the end the combo would look like this.
Back Throw.Wakizashi Stab.M.V.Crescent Cut.Jump.Wakizashi Stab.L.Front Throw.M.V.Sky Stab.Crescent Cut.Rift Walk.Wakizashi Stab.L.M.V.Sky Stab.Dash.Wakizashi Stab.L.M.V.Sky Stab.Dash.Wakizashi Stab.L.M.V.Sky Stab.Crescent Cut
28 hits combo now instead of 22. Simply enough the user have added this part Rift Walk.Wakizashi Stab.L.M.V.Sky Stab.(6 hits)
The user can add on this combo with more Rift Walk’s if the swords are correctly placed.
For example this is possible instead.
Back Throw.Wakizashi Stab.M.V.Crescent Cut.Jump.Wakizashi Stab.L.Front Throw.M.V.Sky Stab.Crescent Cut.Rift Walk.Wakizashi Stab.L.M.V.Sky Stab.Dash.Wakizashi Stab.L.M.V.Sky Stab. (Add another Rift Walk here). Rift Walk.Wakizashi Stab.L.M.V.Sky Stab. (Then back to normal)Dash.Wakizashi Stab.L.M.V.Sky Stab.Crescent Cut
34 Hits combo instead of 28. Cost 2 Energy
Potentially the user could extend this combo to with 14 energy using the best possible combo. Sky Stab. + adding Crescent Cut(even if its unlikely) the combo could reach:
Back Throw.Wakizashi Stab.M.V.Crescent Cut.Jump.Wakizashi Stab.L.Front Throw.M.V.Sky Stab.Crescent Cut.Rift Walk.Wakizashi Stab.L.M.V.Sky Stab.Crescent Cut.Dash.Wakizashi Stab.L.M.V.Sky Stab.Crescent Cut Rift Walk.Wakizashi Stab.L.M.V.Sky Stab.Crescent Cut.Dash.Wakizashi Stab.L.M.V.Sky Stab.Crescent Cut.Rift Walk.Wakizashi Stab.L.M.V.Sky Stab.Crescent Cut.Rift Walk.Wakizashi Stab.L.M.V.Sky Stab.Crescent Cut.Rift Walk.Wakizashi Stab.L.M.V.Sky Stab.Crescent Cut.Rift Walk.Wakizashi Stab.L.M.V.Sky Stab.Crescent Cut.Rift Walk.Wakizashi Stab.L.M.V.Sky Stab.Crescent Cut.Rift Walk.Wakizashi Stab.L.M.V.Sky Stab.Crescent Cut.Rift Walk.Wakizashi Stab.L.M.V.Sky Stab.Crescent Cut.Rift Walk.Wakizashi Stab.L.M.V.Sky Stab.Crescent Cut.Rift Walk.Wakizashi Stab.L.M.V.Sky Stab.Crescent Cut.Rift Walk.Wakizashi Stab.L.M.V.Sky Stab.Crescent Cut.Rift Walk.Wakizashi Stab.L.M.V.Sky Stab.Crescent Cut.Rift Walk.Wakizashi Stab.L.M.V.Sky Stab.Crescent Cut.
124 hits combo.
The biggest reason for this combos existing is not because a user can use it for a ingame(the user could but...it wont happen very likely, the other user can cancel it etc). But with such extreme hard combos to do the expert user could post videos doing this kind of “awesome” stuff(free publicity)
Projectile combos:
The projectile could be added for extra combo damage. They are not in the other combos because they cost swords. And with the massive combo, it cant be done because it cost all 14 energy meaning no extra swords.
Take the extreme point where the user uses only 2 sword points for the 124 hit combo the combo could actually be extended with a triple Edge at the end.
Rift Walk.Wakizashi Stab.L.M.V.Sky Stab.Crescent Cut + Triple Edge(dealing a 3 hit)
Making the combo a 127 hit. But its extremely unlike they user don't need at least 4 swords for the 124 hit.
In a real game the user would likely use 5 energy for 5 more swords. But then actually use those sword in air combos is not impossible. And actually a Crescent Cut in air could be followed by
Rip Edge: Reverse Dragon input.(432) H. Press H again to stop the sword. Then the user can Rift Walk to that thrown sword.
For example this combo:
Back Throw.Wakizashi Stab.M.V.Crescent Cut.Jump.Wakizashi Stab.L.Front Throw.M.V.Sky Stab.
Could be extend by
Back Throw.Wakizashi Stab.M.V.Crescent Cut.Jump.Wakizashi Stab.L.Front Throw.M.V.Sky Stab. + Add Rip Edge.
Now the user can Rift Walk to the new created Rift Hole.
Back Throw.Wakizashi Stab.M.V.Crescent Cut.Jump.Wakizashi Stab.L.Front Throw.M.V.Sky Stab.Ripe Edge.Rift Walk.Wakizashi Stab.L.M.V.Sky Stab.Crescent Cut.
One combo that would be very often is
Back Throw.Wakizashi Stab.M.V.Crescent Cut. + Piercing Edge: Dragon input.(->cr.cr->) M. Press M again to stop the sword.
This projectile attack is so close To Kireme and he is still standing on the ground that it can be followed by a jump(no need for Rift) walk. And then the user can follow up with a normal attack combo.
Lets look at the 22 Hit combo again it would be played like this
Back Throw.Wakizashi Stab.M.V.Crescent Cut.Jump.(Piercing Edge).Wakizashi Stab.L.Front Throw.M.V.Sky Stab.Dash.Wakizashi Stab.L.M.V.Sky Stab.Dash.Wakizashi Stab.L.M.V.Sky Stab.Crescent Cut.(Rip Edge).
Making it 24 hit.
But the best part is the the user can place to more swords without taking a risk of being attacked while placing them.
This could be extended with for example
Double Edge (Double Edge: Quarter forward VH. Press L to stop the low going sword, press M to stop the high going sword).
and then
Triple Edge(Triple Edge:Quarter Backward VH. Press L to stop the mid air going sword, press M to stop the high going sword, press H to stop the low going sword.(only usable in air)
Back Throw.Wakizashi Stab.M.V.Crescent Cut.Jump.(Double Edge).Wakizashi Stab.L.Front Throw.M.V.Sky Stab.Dash.Wakizashi Stab.L.M.V.Sky Stab.Dash.Wakizashi Stab.L.M.V.Sky Stab.Crescent Cut.(Triple Edge).
Making it 27 hit.
And placing down all the users 5 swords at once.
Projectile usage list:
CrL.Cutting Edge
CrM.Cutting Edge
(any of the combos mentioned earlier can be used before.)Crescent Cut on ground
Crescent Cut.
Crescent Cut.Piercing Edge
Crescent Cut.Double Edge
This can be followed as mention earlier with different abilities another thing that can be used is Rift Whip
Crescent Cut.Piercing Edge(or Double Edge)
Crescent Cut.Piercing Edge.Rift Whip
Crescent Cut.Piercing Edge.Rift Whip.Drawback
Crescent Cut.Piercing Edge.Rift Whip.Drawback.Jump
Here the user can add the other normal combos.
For example Wakizashi Stab.L.Front Throw.M.V.Sky Stab.Crescent Cut.
Crescent Cut.Piercing Edge.Rift Whip.Drawback.Jump (add) Wakizashi Stab.L.Front Throw.M.V.Sky Stab.Crescent Cut.
(any of the combos mentioned earlier can be used before.)Crescent Cut in air.
Crescent Cut.
Crescent Cut.Rip Edge.
Crescent Cut.Double Edge
Crescent Cut.Triple Edge
This can be followed as mention earlier with different abilities another thing that can be used is Rift Whip
Crescent Cut.Rip Edge.(or Double Edge,Triple Edge)
Crescent Cut.Rip Edge.Rift Whip
Crescent Cut.Rip Edge.Rift Whip.Drawback
Crescent Cut.Rip Edge.Rift Whip.Drawback.Dash
This could be added in a combo normal combo. More likely Sky Stab with Piercing Edge would be used.
Sky Stab.Piercing Edge(or Double Edge, Triple Edge)
Sky Stab.Piercing Edge.Rift Whip
Sky Stab.Piercing Edge.Rift Whip.Drawback
Sky Stab.Piercing Edge.Rift Whip.Drawback.Dash
This 27 hit combo.
Back Throw.Wakizashi Stab.M.V.Crescent Cut.(Double Edge).Jump.Wakizashi Stab.L.Front Throw.M.V.Sky Stab.Dash.Wakizashi Stab.L.M.V.Sky Stab.Dash.Wakizashi Stab.L.M.V.Sky Stab.Crescent Cut.(Triple Edge).
Could be changed to this.
Back Throw.Wakizashi Stab.M.V.Crescent Cut.(Piercing Edge.Rift Whip.Drawback). Jump.Wakizashi Stab.L.Front Throw.M.V.Sky Stab.Dash.Wakizashi Stab.L.M.V.Sky Stab.Dash.Wakizashi Stab.L.M.V.Sky Stab.Crescent Cut.(Rip Edge.Rift Whip.Drawback)
Making it a 28 hit combo. And keeping all the swords.
And the user could want to place them, for example using this combo
Back Throw.Wakizashi Stab.M.V.Crescent Cut.(Double Edge.Rift Whip.Drawback).Jump.Wakizashi Stab.L.Front Throw.M.V.Sky Stab.Dash.Wakizashi Stab.L.M.V.Sky Stab.Dash.Wakizashi Stab.L.M.V.Sky Stab.Crescent Cut.(Triple Edge.Rift Whip.Drawback).
Making it a 31 hit combo. And placing 3 swords.